|
|
Post by Gane on Mar 12, 2008 13:27:41 GMT 8
Gane: did you buy it at Polymer shop in Taft? can you post nearest landmark? couldnt contact their taft store, was only able to reach alabang and their store there is waaayyy too far  TIA I think you have to call their Pasay branch because I got frustrated calling the Taft branch. When I got there I got my answer, the store is busy most of te time because they supply polymers for fiberglass and others. Here's the contact # 671-9837-39; 671-2773-74 The Taft branch is not that far from the LRT/MRT Station, just walk your way to the new SM Shop and Save (or something) and you'll see their store before you get there. Check this for a list of their branches nearest you. I have to go to Taft because it's a lot more convenient for me than the Pasay branch since I don't know how to get there ;D Ok for a heads up: - made a little mistake because I forgot to apply vaseline mix to the material before pouring the rtv. - rtv doesn't smell, but it does take time to come together using a ration of 10:1 aor 9:1 rtv to hardener. - according to another brand it could take 6-8 hrs curing before I can remove the material, but best used for casting at 24 to 1 week cure. will add pictures soon... ;D |
|
keilu
DX Gashapon Super Robot
  
Posts: 100
|
Post by keilu on Mar 12, 2008 14:51:42 GMT 8
thanks! i'll try the taft branch since i pass by this way on my way home....  |
|
|
|
Post by Gane on Mar 13, 2008 20:48:14 GMT 8
Just a little off topic and heads up...
Future Floor Polish is available in Park Square 1 True Value for P 500 (originally P550), for those who need crystal clear and glossy finish on their kits. ;D
Managed to mix and complete a two part mold. MIxing is the key to the RTV so I suggest investing on plastic cups, popsicle sticks, cheap paint brush, a block of modeling clay and some imitation lego bricks.
Plastic cups for mixing
Popsicle sticks for mixing
paint brush to apply the mold release agent
modelling clay for making the 1st part of the two part mold
lego bricks acts as the wall for the RTV
Next pics and a resin copy of a Stikfas part... ;D
|
|
|
|
Post by Gane on Mar 27, 2008 13:27:57 GMT 8
genji dunno the exact amount now but when i got a 1 liter before it was P162 and the hardener is like 90 ata. rtv580 silicone rubber was like 800 bucks with hardener na. tagal ko na din hindi na pursue yung resin stuff. I did some copies with the FFAC buster sword and kou uraki figure that came with my gp01fb coating version. made some experiments with trying to copy the autobot insignia that came with THS02. Bro I just want to know if you had any experience of tacky or sticky finish on the moulded resin? I've been having this problem and seems the store doesn't really provide enough info about this problem as well. I'd probably have to buy another material, but I want to know if you had the same problem before. Thanks ;D |
|
|
|
Post by wongkeegear on Mar 27, 2008 21:13:44 GMT 8
If its sticky it means you didnt put enough hardener (3% of total quantity of resin equals how much hardener to use) or may na ipon na tubig sa hardener. You can also use laquer thinner (from your local hardware store) and tooth brush to clean out the stickyness. remember to use rubber gloves kasi laquer thinner is harsh for bare skin. it would be nice to have a paint mask too so you dont inhale the thinner.
|
|
|
|
Post by Gane on Apr 3, 2008 1:25:22 GMT 8
Thanks Wongkeegear, btw how far have you gone with this materials? I'm weighing out the use of polyester resin though 'coz of health concerns it raises. It would have been nice if they have polyurethane resin which according to other sites is not as dangerous and can be done indoors. I found a distributor in Fairview but don't know how much the item would be.  The funny thing though is that the shrinking resin could be either budget killers or wasted. The 20% shrinkage is quite noticable and the working time when the catalyst is less than 2% is really a very long wait.  I will probably do the "sandwich method" to make sure that the resin shrinks on the place I wanted it to and not on the important side. ;D If you can do vacuum forming, I would suggest using this over the rtv, because the resin cure best on a non-silicon mold. I realised this when the mixing bowl had better cure than the one inside the rtv mold.  |
|
|
|
Post by wongkeegear on Apr 18, 2008 15:32:42 GMT 8
GaneIt would be great if you can find info about polyurethane resin because fairview is kinda an unknown place to me. Yeah i know polymer products made me kinda woozy when we were in the seminar. Now i have a 3m medium respirator with 6001 organic cartridges so i can work more comfortably. I noticed shrinkage when the mold isnt covered. I think you have to experiment on how much hardener to put depending on how the temperature is during the process. Or you can try using the non premix kind, the ones that take longer to set. I think vacuum forming is for low detail kits whereas rtv is for more detailed ones. I'm also planning on getting a digital scale with a 500 gram capacity. And hopefully I can copy some of my resin kits in the weeks to come.
|
|
|
|
Post by Gane on Apr 23, 2008 1:24:46 GMT 8
GaneIt would be great if you can find info about polyurethane resin because fairview is kinda an unknown place to me. Yeah i know polymer products made me kinda woozy when we were in the seminar. Now i have a 3m medium respirator with 6001 organic cartridges so i can work more comfortably. I noticed shrinkage when the mold isnt covered. I think you have to experiment on how much hardener to put depending on how the temperature is during the process. Or you can try using the non premix kind, the ones that take longer to set. I think vacuum forming is for low detail kits whereas rtv is for more detailed ones. I'm also planning on getting a digital scale with a 500 gram capacity. And hopefully I can copy some of my resin kits in the weeks to come. Nice to see someone still working on this stuff, I kinda been dragging I disagree off here and there with the cured resin and the costs are going way up. I can only tell you that the guy selling the polyurethane resin told me that I need to go there to get more details. Well he wasn't very helpful with pricing, and with this material costing around a grand per set (A and B) similar to the one used by Dan Perez i think I'll pass until I can have the budget. It doesn't dry clear though but the chances of making a mistake is minimized unless you have a defective scale... Here's a copy of their address, the product they distribute is Smooth-On: www.kabeet.com/flash/detail.php?name_id=1108536This is why I backed off - the trial set is already almost 1K and the next size is a gallon for almost 3.2K and that's the Smooth-on price not the distributors': www.smoothonsecure.com/store/index.php?cPath=291_1_10It is safer than polyester resin but a lot more expensive... in the end the finished product will have to be too expensive to sell. I think I have a surefire way of getting almost no shrinkage (although I up to a few ml of resin just for experimenting) the thing is I have to use this "formula", 10ml resin + 10 drops catalyst + 1 drop wax This will really heat up and produce tiny bubbles which I don't know how to avoid. However I will have to resort to making a new mold where these bubbles will accumulate somewhere they can't be seen. My problem for the time being is the formation of tiny veins, it tends to lessen when I cut a few drops of wax but the finished item becomes a bit tacky again. I can sand it off later on though. This is what I'm planning to come-up this May and hopefully it pans out. It's a bit pricey for its size, but most of it will be because of the other materials which I can't replicate using rtv and resin. I'm planning on either air dry clay or epoxy putty for the hair part and some waterslide decals for the eyes.  And I have a few "gachaponesque" figures after introducing xxxxxxxxx... I already have drawn up 3 designs and looking around online if I have an original. |
|
|
|
Post by wongkeegear on Apr 23, 2008 22:54:08 GMT 8
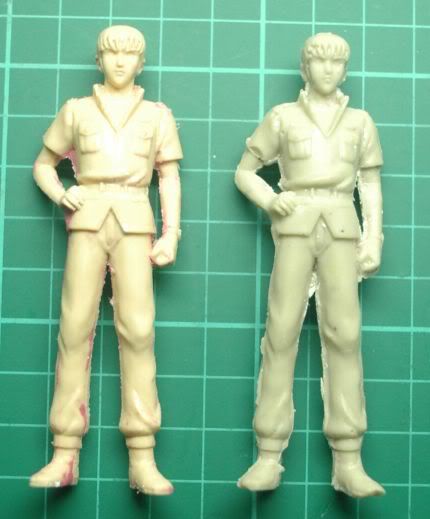
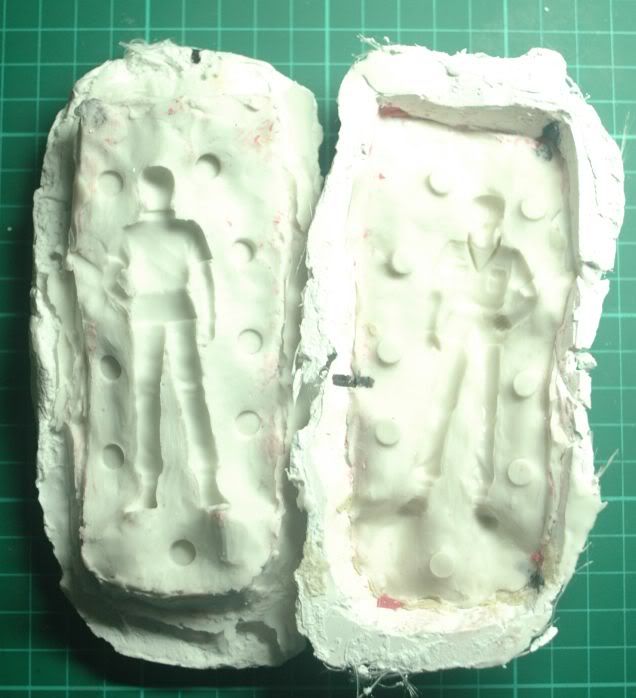
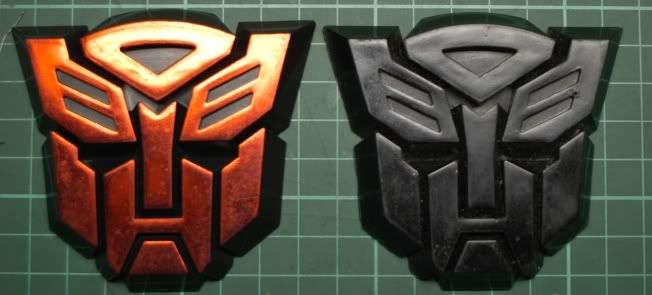
Here are some of my first resin creations  Left - orig Right - copy  First mold I made.  Practicing on the autobot insignia. The original is on the Left. |
|
|
|
Post by Gane on Apr 24, 2008 1:10:23 GMT 8
Nice I see you have success in molding figures. Unfortunately I'm still in the process of minimizing the veins formed during cure. I can't show pics because it doesn't appear on camera properly, they're like vines creeping to the part of the mold where I pour the resin. The veins don't appear on small things like a Stikfas, but the 2" head is really giving me this results. Have you encountered this?
Btw, I'm using the non-premix kind which cures clear and would require pigments for color. The Taft branch stocks a limited supply of other stuff which their regular clients don't normally buy, like the pre-mixed resin and foam board.
This morning they are out of rtv 585, I should have tried the rtv 580 because it's a lot more flexible and cheaper. I'll probably get supplies tomorrow and start the engines... I'm making a new mold to solve the vein problem.
You mentioned making a copy of a resin figure. I hope you can dismantle those joints because they are a tight fit unless you have those that require painting and gluing.
I like the Autobot logo; it's a very clean and other than the color, it's indistinguishable from the original.
Does the mold for the figure have an inlet for the resin or you used the sandwich technique?
I also see fibers on the mold and it looks white; is that the rtv 580 or plaster of paris?
|
|
|
|
Post by wongkeegear on Apr 24, 2008 10:14:10 GMT 8
The mold for the Kou Uraki figure is 2 part, altho i didnt do it properly, kinda a sandwich process where mold lines would come out from the sandwiched seams.
I reinforced the mold using plaster of paris with some fibers glass.
I also used RTV 585 because the instructor tells us its more durable and lasts longer than RTV 580 he he he.
The resin figures i plan to copy are still unassembled but i have to properly plan making the mold now so i can just pour in the hole than making a sandwich mold which is hard.
I think veining is common for 2 or more part molds and you need to sand the veins from grit 200 to 100 0 and use automotive polish after to make it clear again.
|
|
|
|
Post by Gane on Apr 26, 2008 13:15:59 GMT 8
Thanks, that plaster reinforcement I didn't realize before so I could have saved more on the rtv part. I just want to make this part clear; a thin coat of rtv is applied over the figure just enough to cover it, then the plaster reinforcement is added? If that's the case, now I know why I'm getting those veins. The rtv mold has been too thick since it has to cover at least 1 1/2 in. of the face, so the heat produced by the curing resin creates the bubbles and the veins... I see my problem solved I suppose.... ;D Sorry for the ramblings ;D I will have to do the sanding as I have thought and apply a clear coat to even things up or buy future.  I hated sanding...  Are those resin figures the unpainted kinds or the ones shipped like gachapons in blind boxes? I was into that but had to stop when my airbrush broke... my brush strokes aren't fool proof yet ;D The 585 is a lot more expensive than the 580, but according to the personnel the 580 is a lot more flexible so it can be used to those molds with intricate shapes. Btw, if you experience some shrinking with the pouring method, make the pour spout big and deep, because too shallow will eat all the remaining resin on that area; too small and you will have a hard time pouring and timing when the resin cures. I made the final mold last night and forgot to buy the silicone oil for the rtv so I had to apply the catalyst a little thinner so I could handle how long I have to work on before it hardens, now I think I made a 24hr mold which is slower than the last one which was 3-5hrs. I'm placing the pour spout somewhere it will be covered on the final stage to hide all the blemishes. Reshaping of the head comes next and then comes the body part. I'm hoping to avoid anymore mistakes he he he  And lastly, those clear dyes are a wallet killers, at almost P80/tiny bottle and those pigments too, it's breaking my pockets in half ;D |
|
|
|
Post by wongkeegear on Apr 26, 2008 16:32:06 GMT 8
yeah a plaster component is really needed because it saves rtv costs and reinforces the mold while pouring resin in it.
Usuually you put in 1 thin layer of rtv to work out the details and bubbles. Put layer then let dry and apply new layer. I usually do 4 or 5 layers of rtv. I also found out that you can reuse old rtv as fillers. Cut them up and put em in when filling in the 3rd or 4th layer.
After the rtv dries dont remove the model from the mold, instead put plaster of paris so it holds the original state of the model. then after clean the clay on the other side of the model and repeat rtv process.
the dyes are ok, you usually need a drop or 2 to saturate the resin with the intended color.
The small figure i used came with the GP01FB 1/100 MG model kit.
Good luck on your resin projects, good thing you have time for it.
|
|
|
|
Post by Gane on Apr 28, 2008 0:57:32 GMT 8
Thanks, for the time being I have all the time in the world I'm self studying Flash 8 and I'm waiting for projects from my previous job. Flash based animation is getting more projects right now... So for the time being I'm delving into the "art toy"scene and coming out with the xxxxxxxxx. xxxxxxxxx idea came about because of the "Mini Me" booth in Mega B where they make plasticine (sculpey) caricatures of the customer. Those things costs around 3K; so I came up with xxxxxxxxx, cheaper and customized. The name is a dead give away already, I'll probably call it "xx xxxxx" for those who don't understand what the name stands for.  Along side it, I'll also come out with "xxx"... I got the idea from the custom toy makers and art toys... it's like gachapon for mature audiences. Here's a link for more ideas of what they are: Kidrobot shop ;D I was planning on customization parts for Gundam, but I don't have enough to get the Gundam 00 kits due to my budget. The clear or tinted eyes for HG kits would be a good business venture though... ;D |
|