|
|
Post by raps on Jan 17, 2008 15:24:06 GMT 8
It's nice to see another winger.... thanks for sharing bro....
|
|
|
|
Post by tagabukid on Jan 17, 2008 23:38:44 GMT 8
night shift mode again... apologies for my late replies  sir PilapZ, tools galore = less savings lol... modelling 101? actually, i am planning to build a website that tackles the steps i'm doing when building a kit - not a tutorial but more on tips; of course not to mention being the main 'showroom' of I disagreeembled kits, too... do you think it'll be a good idea? sir no3Ljm, oh nose, am not a pro! i just love sharing what i can share, that's why i also aspire to be a teacher lol  ah, it doesn't matter if you heavily modified, customized, maximized, minimized, rasterized, whateverized your kit or simply snap-built it... what matters is the 'bliss' achieved after the sprues have been emptied. that is more than enough to cover the expenses and efforts we've poured to our beloved kits... sir raven55, raps, glad to be of service, sir... sir qb, actually, i use either epoxy (i forgot the brand, will post this weekend), tamiya thin cement and loctyte gel for sealing seams; what i use depends on the 'degree' of the seam. -for large gap, epoxy. the idea is to fill-in the gap and let it cure overnight before sanding to even the surface. -for the medium ones (most notably the wing parts), loctyte gel. let the gel run between the seams and wipe off the excess by using a flat medium (e.g.: ruler). the gel will sip between the seams and will thus 'bridge' slight gap. -for miniscule seams (tiny parts such as the biceps, shoulder, etc.), tamiya thin cement will do the job :-) as you all know, snap-built kits such as our beloved gundams are 'combined' through male pegs and female 'sockets'. what i am doing after test-fitting is place a sufficient amount of thin cement on the male pegs before 'plugging' them to their female counterparts. i'll press as hard as i can for half a minute (to ensure good contact since thin cement dries up pretty fast), and will judge the 'degree' of the seam afterwards. as for your question when the epoxy is applied, that's sort of 'you-can't-take-me-apart-anymore' thing since epoxies are pretty hard to deal with when they become, uhm, hard. therefore, i close the part fully when i apply the epoxy, then mask the unaffected area for priming, then paint. kindly clarify me if my answer addressed your concern, sir ... actually, that's the same mindset i've had before eventually taking the risk. isn't wonderful how we gundammers think alike when it comes to the 'well-being' of our kits lol?! well, i've scouted for cheap yet 'non-sticky' clay at national bookstore and decided to pick dong-a clay bar (retaills for about P20.00, if memory serves me right). i'm pleased with the result as it doesn't stick on the kit ( not sure if this applies to all, though; maybe i just got lucky i don't know). and in case it happened to stick, it can be easily washed by running water. the downside is that the clay masker is not reusable (then again, so are masking tapes). plus side is that clay's much easier to mold compared to masking tape... thanks for reading... |
|
|
|
Post by Lotur on Jan 18, 2008 0:41:01 GMT 8
your work log was one of my favorites back at mp, very thorough step by step explanations! daym dami ko natutunan runkeep up the awesome work sir and thanks a lot for sharing all of these information  |
|
|
|
Post by tagabukid on Jan 18, 2008 1:22:56 GMT 8
thanks, Lotur! it's nice to know that all that i've written never goes unread. unfortunately though, still trying to figure out how i could share my latest worklog considering the 192 images that'll accompany it |
|
|
|
Post by PilapZ on Jan 18, 2008 11:34:31 GMT 8
of course i think it's a great idea to create a site. ;D it'll be helpful for both new and seasoned modelers. we all have different styles, sometimes mixing the styles would be awesome. looking forward to your site and works amigo. |
|
|
|
Post by no3Ljm on Jan 18, 2008 14:42:41 GMT 8
@tagabukid
same thing here bro. that's why i decided to make a Gundam-based blogsite. so if i start airbrushing or modding my kit, i will post it there. too bad all i posted lately are just snapbuilding kits. hehehe. but you're correct, for me it's the fun and contentment after you build a kit is more important. and share to everyone the things you notice so that you can help them decide which to buy and what to expect.
again, great job and thanks for sharing us your tips. more power and happy building!
|
|
|
|
Post by qb on Jan 21, 2008 5:05:26 GMT 8
awesome tips and insights sir! ;d thanks for answering my questions! as already suggested, why don't you make a blogsite/website so you can post pics and tips to your heart's content. You can try some free blog/hosting sites such as Blogspot or Multiply to get you started. |
|
|
|
Post by tagabukid on Jan 25, 2008 14:15:21 GMT 8
holy gundam, i am ashamed! i haven't had the time to post on this thread for almost a week! my sincerest apologies, especially to sir JQ! it's been a busy week, being a team lead in a SE's salary... gripes... anyway... hope am not yet too late... ----- tagabukid's Mark and Scrape Explanation: 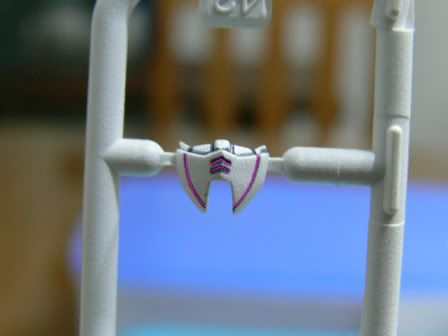 pink line denotes the panel lines. notice how the ink of gundam marker overflowed, making the panel look thick. 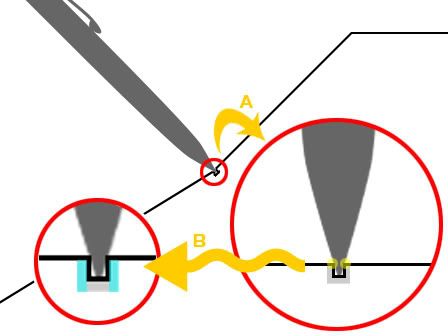 the logic behind this is not the thickness of the marker, but the length of the "exposed" area of the marker. e.g., in "A", the two white yellow circles indicate the "affected" area of the panel, "kissing" the exposed part of the marker, thus causing the overflow. the overflowed panel line is emphasized by the cyan rectangles of "B". 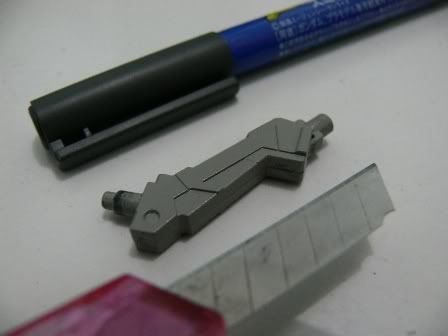 bare panels to be marked... 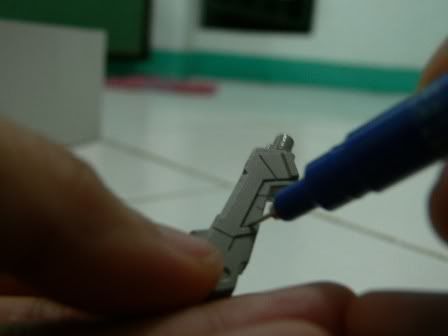 panelling via gundam marker...  initial panel lines; notice the thickness caused by "overflowed" ink... 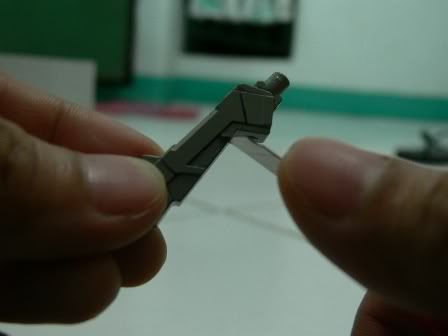 slowly, surely and smoothly scrape the overflowed panel lines (remember the cyan representation above). do not 'rub' the blade, just let it glide smoothly to avoid scratching the paint (this part takes patience and practice)... 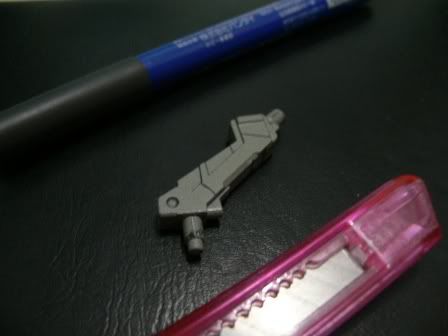 thinner, cleaner panel lines... hope this helps... |
|
|
|
Post by tagabukid on Jan 25, 2008 14:19:55 GMT 8
thanks for supporting my idea of putting up a site, fellow gundammers! as heero suggests, act on your emotion! am currently building my site and hoping to launch it the soonest possible time... |
|
|
|
Post by PilapZ on Jan 25, 2008 16:07:03 GMT 8
when overflowing happens, i used sandpaper to gently scrape off the excess ink. i went for the blade technique but it was scraped the wrong way, i wud ruin the paint job.  with steady heads + right direction of wiping + plus scrape method(ala sandpaper) = decent paneling. end result shud look like my NU's head. (results may vary) 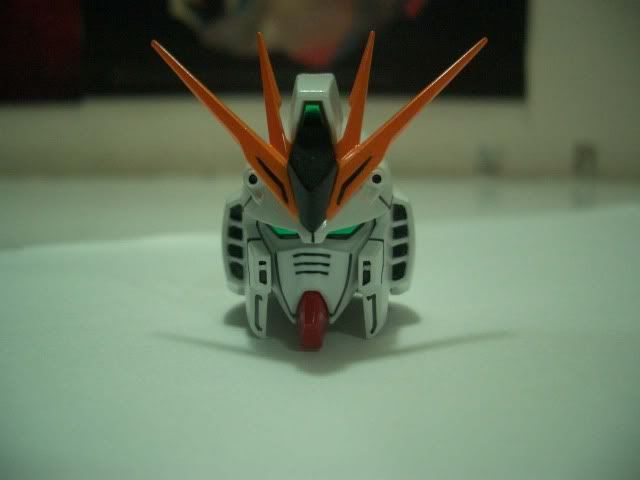 hope that helps too amigo. |
|
|
|
Post by tagabukid on Jan 25, 2008 17:56:54 GMT 8
yes, sir PilapZ, i also tried that alternative. thanks for sharing if you are not painting your kits, just erase the overflowed panels with an eraser or smudge it with your fingers. PS: sir PilapZ, your kits are growing! any plans of putting up a mini museum soon lol ;D anyway, as i always point out, don't let our 'techniques' here be your guide. just do what you're comfortable with. |
|
|
|
Post by Lotur on Jan 25, 2008 18:52:26 GMT 8
awesome update bukid- -and a diagram to boot! kahanga hanga ka kaibigan ;D palit na lang tayo ng PG at MG wzc kaibigan ;D payapa ;D keep up the comprehensive wips and thanks a lot for sharing! |
|
|
|
Post by GN on Jan 25, 2008 19:03:58 GMT 8
Nice detailed tutorial dude!... I used to use the same gray marker but when I discovered the sumire gray is easier to clean, I shifted to it. Have you tried the sumire gray marker on painted kits?
|
|
|
|
Post by qb on Jan 25, 2008 20:39:35 GMT 8
great tutorial there bro! it even comes with pictures! very informative. do you plan to do a book too after the website? i agree that the scrape method is quite difficult so what I do is just smudge it with my fingers to "remove" the ink overflow. i;m not that good with a knife so this works for me. ;D |
|
|
|
Post by tagabukid on Jan 25, 2008 21:18:27 GMT 8
awesome update bukid- -and a diagram to boot! kahanga hanga ka kaibigan ;D palit na lang tayo ng PG at MG wzc kaibigan ;D payapa ;D keep up the comprehensive wips and thanks a lot for sharing! ah, cannot be... because it's unfair! your MGs(sssss) - not to mention the captures as well - are priceless already! then again, peace, too! hahaha. kidding aside, i really love your destiny... d**n still trying to make ends meet to grab that kit (though am clueless with the seed series, your shots alone made me want it! you're such a BI lol) thanks for appreciating my technique's explanation, sir |
|